Attempt this project at your own risk.
Quickdtoo and GBO are in no way responsible for the out-come. We're not responsible for any mess-ups, deaths, injuries, ect.
I know it sounds harsh, just making sure you realize that using any of this info means you're on your own. A second hand barrel may or may not fit, each barrel is individually fitted to the frame at the factory, so they aren't one size fits all, if it doesn't fit, you can fit it yourself using the barrel fitting info below,
you may also have the option of sending it to H&R for them to fit it for $30 plus the cost to get it there, but there's no guarantee that they'll be able to fit it. Generally if it locks up loose on the frame they won't, but if it won't completely close and lock up, there's a good chance they can fit it.http://www.gboreloaded.com/forums/index.php/topic,242403.msg1099389380.html#msg1099389380Just to make it clear, all work needs to be done on the barrel, never make any changes to the frame or your other barrels won't fit proper.
Check the gap at the top of the barrel, if the gap is bigger there than closer to the middle, you'll need to remove metal from the pivot on the underlug.
Before removing any metal from the pivot, use a flat mill file to make sure the barrel face at the chamber is flat, you'll see metal being removed on the high spots as bright while the low spots remain blue. A little degreasing and touch up blue will restore the finish after you make sure its nice and flat. DO NOT file the breech face flat if a factory cartridge is perfectly flush with the barrel face, doing so will cause negative headspace and the chamber will need to be reamed a bit by a gunsmith. But if the face of the cartridge is slightly recessed below the barrel face, you should file the barrel face to true it up and reduce the built in headspace caused by the uneven barrel face. Removal of the ejector is necessary to do the filing, an extractor can remain in place, but you'll probably want to remove the extractor as well to clean up after filing.
I used a drill bit wrapped with 180-3320 grit emery or crocus cloth to deepen the pivot point on the barrel.
If you can find a file with the correct diameter, if will work tooThe pivot pin will measure
.375", so you need a combined total of that amount between the drill bit and emery cloth thickness to maintain the pivot's size. Be careful not to get it out of square and not to make the pivot point any wider(change the radius), just deeper. Keep working it until it locks up and there is no visible gap between the barrel and standing breech. It should lock up tight on a .002" feeler gauge blade and snug on a .001" blade,
if it locks up on aluminum foil which is about .0005" thick, it's even better. Once you get the gap down to a minimum, you need to check the latch engagement. Clean, then smoke the latch shelf on the barrel with a candle, then mount the barrel and close the action, you should have no more than .080" latch engagement on the latch shelf as shown by the mark in the smoked shelf. If it barely engages, hone the latch shelf on the barrel with a stone to remove some metal and smooth the surface, check it again, continue until you get good engagement, but not too much, if you use up the travel of the latch, the barrel will be loose.
After the barrel is properly fitted, the barrel release lever(button) should rattle a little if you shake the rifle with the action closed, if doesn't there's likely too much latch engagement, the release button should be about mid travel when the barrel has proper latch engagement. When the action is open, you'll see that all of the latch travel is used up and the release button will be all the way up and it won't rattle when shaken. Discussion on shimsTemporary Shim by thejanitorIf the gap is too much when locked up, you can make a temporary shim to wrap the pivot pin to find out how thick the shim needs to be to get the barrel tight at the standing breech. The goal is to have no visible space at that point, and a .002" feeler gauge blade placed across the breech above the firing pin should be real tough or can't be pulled out of the space there...while a .001" blade can be pulled out with some effort. These 2 "specs" are what a factory fitted barrel will yield,
some are even tighter and have no measurable gap which is ideal. I use soda pop can material for the temporary shim, it usually measures .002" and you can use multiple layers to get a thicker shim. Once you have determined the right thickness, buy a cheap feeler gauge set at an auto supply store, look for a set that has .001" increments in the blade assortment. Choose the right size blade, anneal it by heating it cherry red then let it air cool. Cut it to the width of the barrel lug pivot then file the piece so the edges are nice and flat. Rough up one side of it so epoxy will adhere good. Clean it and the barrel pivot well with acetone or alcohol. You'll also need something that is the same diameter or slightly smaller than the pivot pin which is .375" in diameter. I have a brass drift that is just the right size that I use to press the shim into the pivot using a "C" clamp. Just place the shim against the pivot surface, place the round drill bit or whatever you use against the shim, place the clamp jaw against the round stock and the other screw end of the clamp against the edge of the latch shelf and tighten the clamp. This will force the shim into the pivot surface and form it to the pivot. Once it's formed, just mix up some JB Weld epoxy and epoxy it together, or use
solder. Make sure you use a release agent on the round piece so you don't epoxy it to the barrel. I used TC Bore Butter on mine because it was handy, but Pam or just about any oil or grease should work, just be sure not to get the release agent on the epoxied surface or the epoxy won't hold. Wipe away any excess epoxy from the underlug surface and let it cure. I used the 4 minute JB Weld and it is fully cured in 4hrs at room temp. After it's cured used an 11/32" drill bit wrapped with emery cloth to make the final fitting. You want the emery cloth wrapped drill bit to measure as close to .375" diameter so the pivot surface is the same size as the pivot pin...so use the right size drill bit to get that total diameter including the emery cloth. After you get lock up and the correct spacing checks are made, work on the latch shelf according to the instructions above. Once you get everything fitted correctly, apply a bit of grease or oil to the pivot pin, I use Moly-Fusion or Tetra on mine, but any lube will help maintain the tolerance of the fit so the barrel doesn't loosen over time. The latch and latch shelf
should be dry but a few members have reported it may shoot better with oil on them..
NEW Latch Engagement and Viewport plug removal toolFred M has a fair graphic of the handi action if you would like to see what parts are what...
http://www.angelfire.com/ma/ZERMEL/hrultrawp.htmlI would highly recommend that if you don't feel comfortable fitting a barrel, just take it to a gunsmith to have it fitted, this DIY process isn't for everyone.
Tim
Latch Shelf Shim by Partsman NEW Latch Shelf Repair by trotterlgNEWLatch Shelf Shim and Off Center Pin Strike Repair by cwlongshotLatch shelf with the light area of the shelf showing proper latch engagement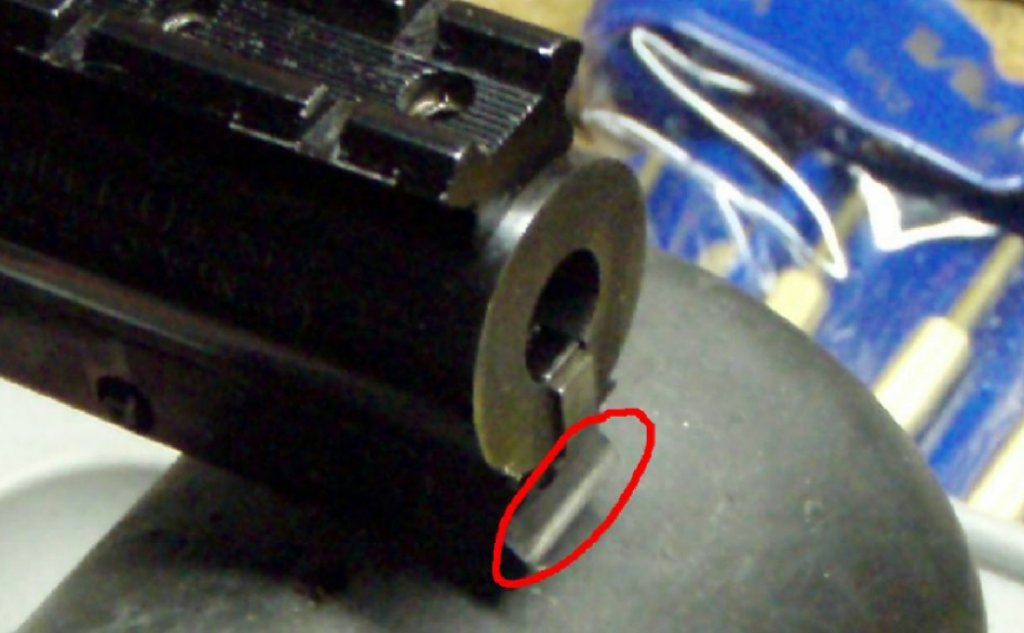 EDIT: Here's an update on the epoxy to use that may be better suited than regular JB, although I've not had much luck with it, I still prefer regular JB Weld, it has a compressive strength of 10.7kpsi compared to the 10-14kpsi of the Stik....http://www.gboreloaded.com/forums/index.php/topic,88528.msg534874.html#msg534874NEW!! Barrel Fitting FixtureUnderlug ImprovementShimming the Underlug to eliminate Lateral MovementAn Example of improper latch engagementNEW!! Jon's barrel fitting experience and a tool for removing the inspection port plugGoop Superweld (renamed Automotive) Epoxy 36kpsi compressive strength
Soldering Shims

