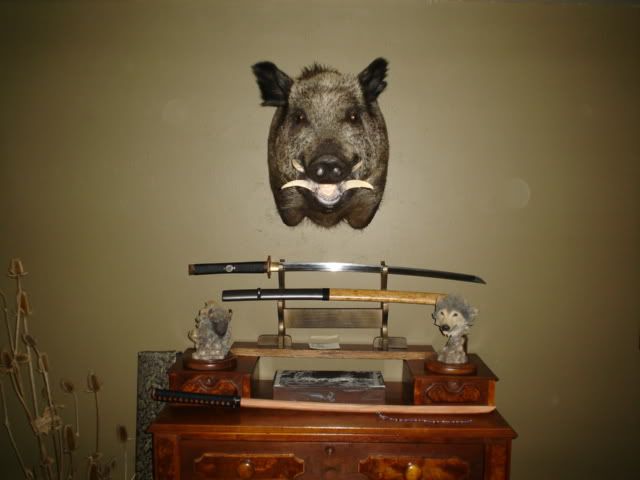
My personalized Katana I decided some months ago to do a rebuild, a “Home Improvement Project”, if you will, for a katana sword. I started with a Cheness Cutlery Mokko Katana, in the 1060 spring steel or mono steel version. In this thread, rather than use a lot of space with pics, I will use links, thanks for looking.
JeffG
The katana came from Cheness as promised, very nicely done with all of the proper appointments: cotton ito, a black lacquer saya, metal furniture, and a blade that was nicely sharp. The tsuka was fitted well, and there were no “rattles or squeaks”.
http://img.photobucket.com/albums/v504/irondog_54/KatanaProject003.jpghttp://img.photobucket.com/albums/v504/irondog_54/KatanaProject004.jpghttp://img.photobucket.com/albums/v504/irondog_54/KatanaProject008.jpgI dismounted all of the furniture and the tsuka, the tsuba, and all of the metal furniture. The first thing that I did was to fashion a kashirii out of eucalyptus.
http://img.photobucket.com/albums/v504/irondog_54/KatanaProject017.jpgThe stuff is as hard as brass, and because it is lighter than the metal, it placed the balance just that much more forward, a preference of mine. The kashirii was brass-pinned, and epoxied to the tsuka.
I sliced off a piece of hexagonal brass stock, and laid out a tsuba. After the piece was shaped, polished and sanded, I engraved a mountain scene with a large weathered pine tree in the foreground, on the omote side.
http://img.photobucket.com/albums/v504/irondog_54/KatanaProject012.jpgOn the handle side of the tsuba, two sprigs of pine boughs peek from opposing corners, and a small rendition of a mountain is in another corner.

The tsuba was given its patina in a stovetop solution of copper sulfate crystals and water. The tsuba turned out to be 1/16 of an inch thicker that the factory unit, and weighed about 4 ounces more. This further drove the point of balance forward. I was able to remount the tsuba using the factory mekugi and seppa.
I wrapped the tsuka in one run of black nylon waterfowl decoy cord, and used urethane to stiffen it, and keep it in place. I assembled the katana normally, and fitted the tsuka for the thicker tsuba.
http://img.photobucket.com/albums/v504/irondog_54/KatanaProject021.jpgThen I applied a second run of cord over the first, concealing the mekugui. As I wrapped, I tied in the menuki I fashioned from moose antler. The menuki bears the same pine bough theme from the tsuba; scrimshawed into the surface and inked.
http://img.photobucket.com/albums/v504/irondog_54/katana009a.jpghttp://img.photobucket.com/albums/v504/irondog_54/katana018a.jpghttp://img.photobucket.com/albums/v504/irondog_54/katana019a.jpgI used more urethane to hold the cord and menuki in place; I brushed on fast drying Minwax, and sponged off the excess with a rag. The grip is solid and slightly rough, but allows the grip to shift without feeling like you are going to lose the sword.
The saya that I received with the sword was very well done. It came with a plain wood throat, and a black cotton sageo. Stripping off the factory lacquer proved to be more difficult than I had anticipated, the coats of lacquer were very thick, despite the mirror finish. I didn’t want to use any stripping chemicals or turpentine or solvents, so I stuck with 150 grit sandpaper. Once I reached the wood, I sanded and steel-wooled the surface.
I applied bird’s eye maple veneer to the bottom half, placing the seam on the ura side. I wetted the veneer, applied Titebond II woodworking glue to the veneer and wrapped the saya with it. While the glue was still wet, I adjusted the seams and squeezed out the bubbles. A careful mummy-like wrap of masking tape kept it tight to the wood. After it dried, I removed the tape, and the veneer was trimmed and sanded.
http://img.photobucket.com/albums/v504/irondog_54/katana012.jpghttp://img.photobucket.com/albums/v504/irondog_54/katana011.jpgI masked and sprayed the top half of the saya with Krylon hammered metal finish. After both halves were sanded and ready for clear coat, I wrapped the juncture of the two effects with several wraps of the same cord I used on the handle. The whole saya was then clear coated. I have not re-applied the sageo, but it will most likely be black cotton ito.
http://img.photobucket.com/albums/v504/irondog_54/katana011a.jpg
I polished most of the etched or brushed hamon off of the blade, with nonabrasive metal polish and a soft piece of leather. It took me 4 or 5 hours to get the blade the way it is now.
http://img.photobucket.com/albums/v504/irondog_54/katana020a.jpgFor a dojo-cutting level sword, the katana meets my expectations, and it is a pleasure to have “my way”. It is what it is; it didn’t set me back a bundle either. I am happy with the edge it took, and pool noodles and overly long zucchini are afraid for miles around. I will likely graduate to tatame later this year, or stalks of bundled corn. Right now I am busy with the boken teaching the basic cuts to my 14 year old.
Still, I have the idea that a decent differentially tempered blade might be nice if…..
