Author Topic: Making a fore end pressure point against the reciever  (Read 6417 times)

0 Members and 1 Guest are viewing this topic.

Offline LaOtto222

  • GBO Supporter
  • Trade Count: (0)
  • Senior Member
  • *****
  • Posts: 3828
  • Gender: Male
Making a fore end pressure point against the reciever
« on: August 07, 2008, 12:07:56 PM »
I know the fore end can be trouble some on some guns. I thought maybe this modification would help and probably would not hurt. The thought was to put some pressure on the fore end by installing a spring and plunger through the plastic for end spacer to bear on the receiver. This would put constant pressure at this point. It should be repeatable every time the gun is put together. It is reversible by removing the plunger and spring. It can also be adjusted to put more or less pressure in this spot. I hope the following instructions and pictures will make this clear.

Parts list
1 spring about 1 1/2" long X .310 OD wire Diameter ~ .048"
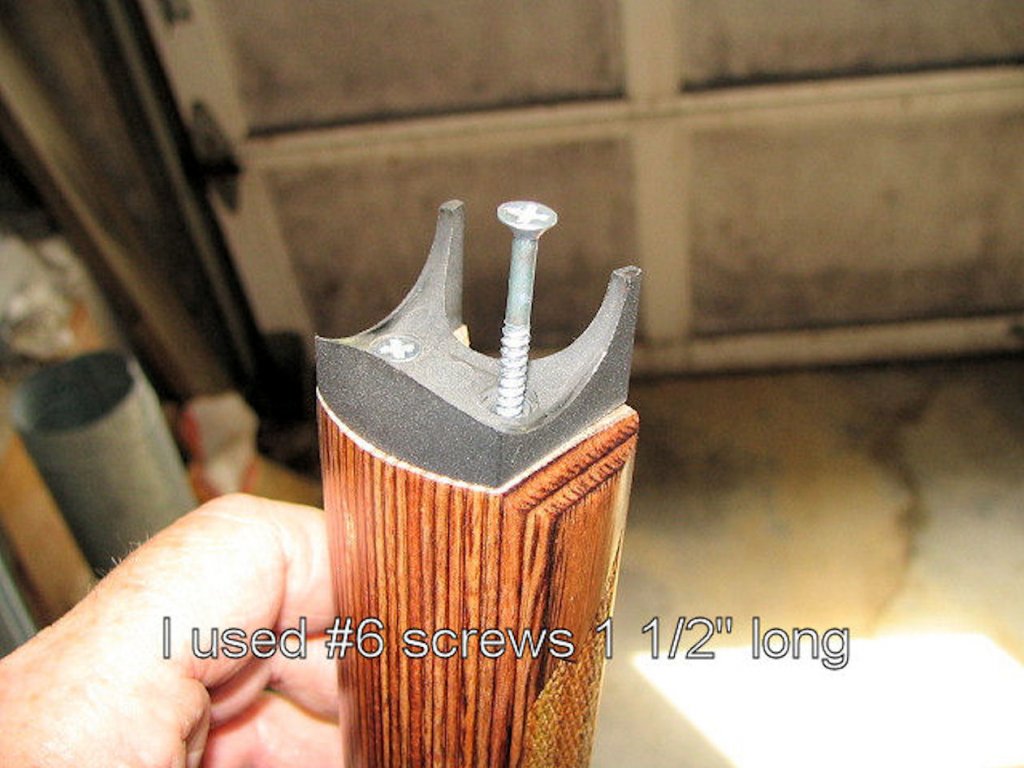
2 #6 X 1 1/2" wood screws.
1 package of license plate nylon screws.

I bought the supplies at my local Hardware store. If I had a lathe, I could have turned the button out of round stock instead of using a license plate screw, but I am tool challenged so I get by with what I have. That will change some day :)

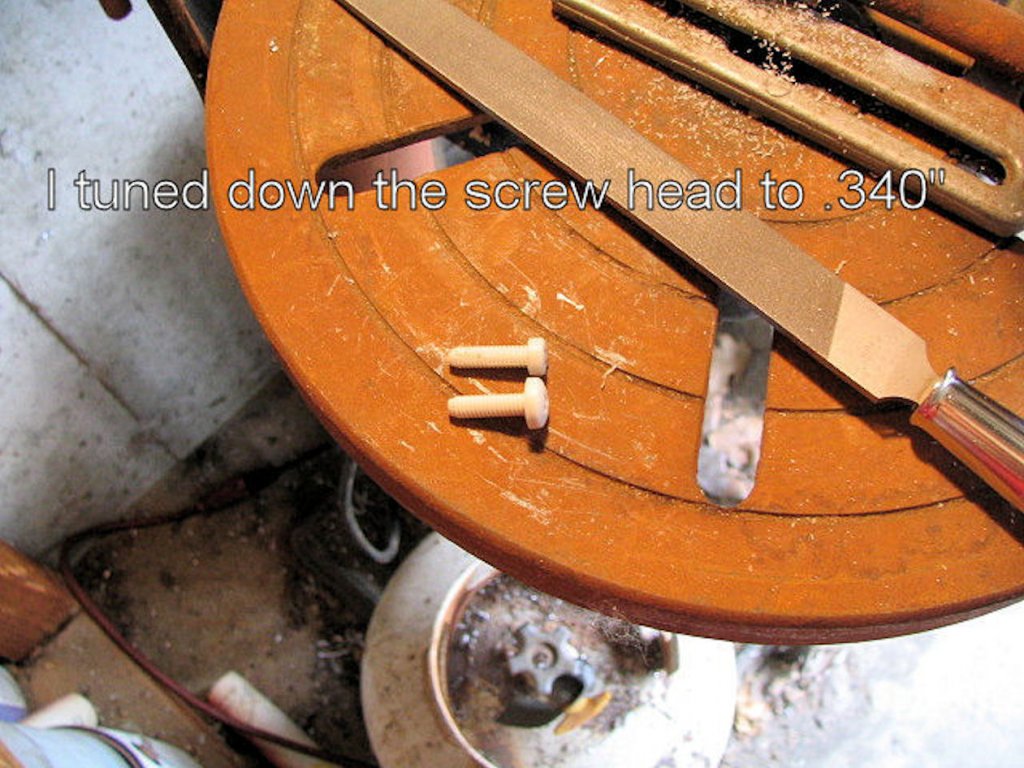
The first thing I did was to turn down the head on the nylon screw to .340". It does not take a lot of pressure to cut the head with a file, just take your time and clean the file periodically and check the head diameter.


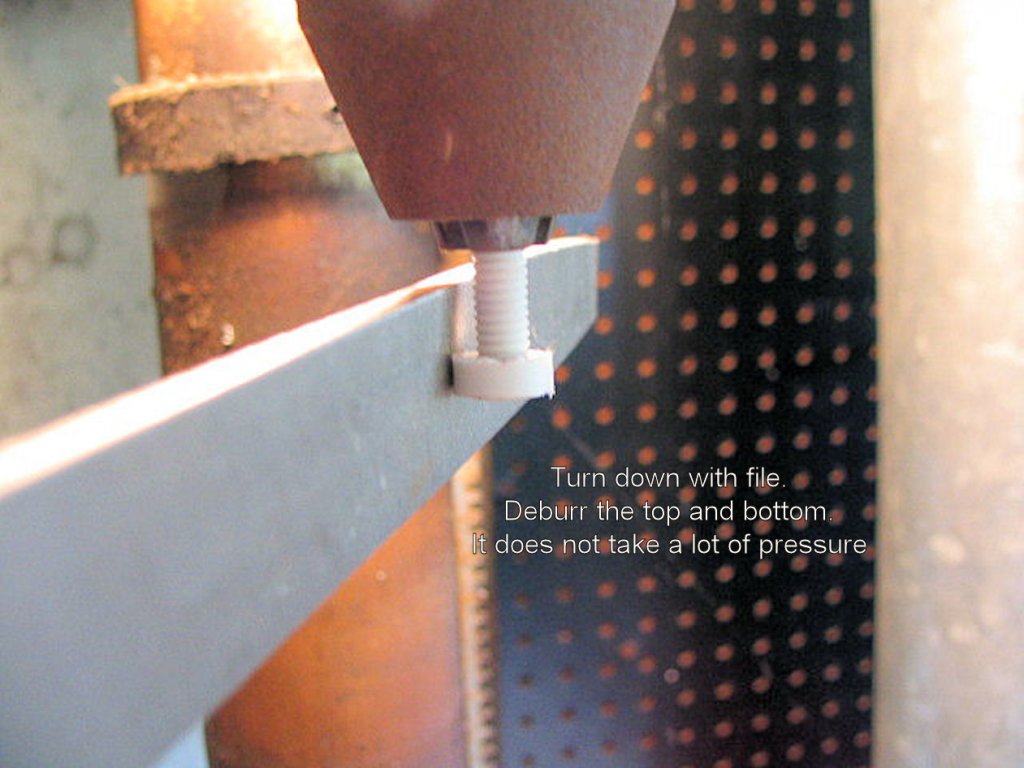
This is so it will slip in a 3/8" hole, you will see later.

The turned down head compared to unturned head


The next thing I did was to replace the screws that come with the fore end with the #6X 1/1/2" screws. I did this so they would not strip out with the spring pressure pushing against it while off of the gun. I used a ratcheting T-handle and did not drill a pilot hole. You might want to do a pilot hole to make sure the fore end does not split out. Do not over torque the screw, it might break off or strip using too much power. Do not use a powered screw driver - you do not want to strip out this deep hole or worse break the screw off.


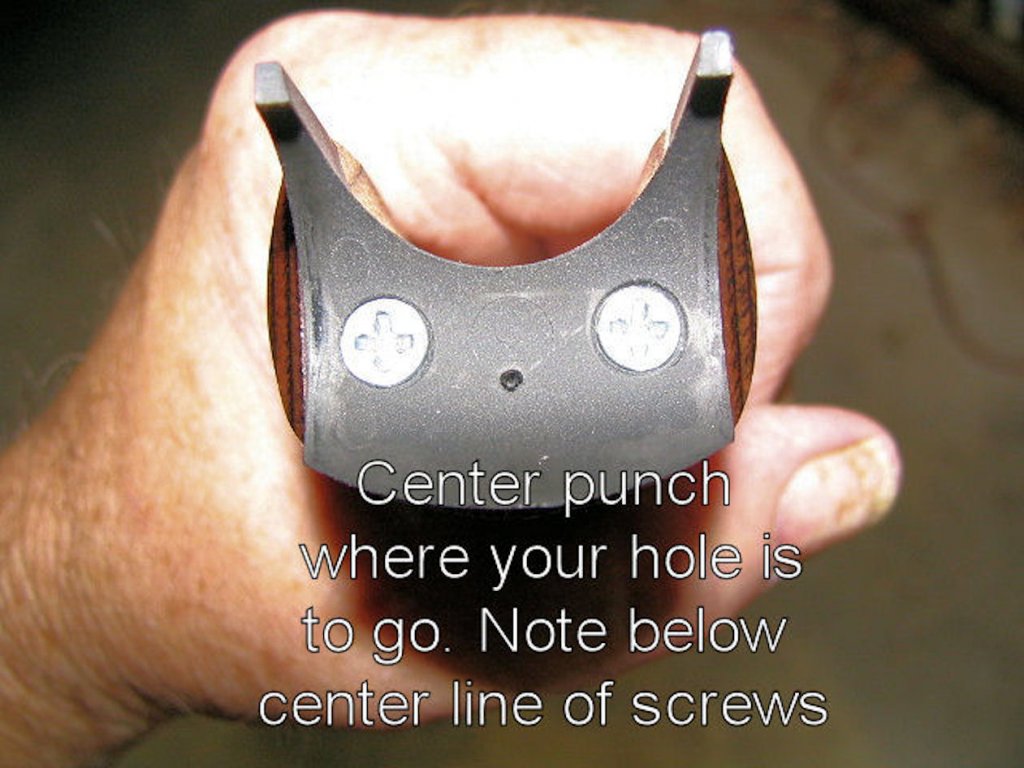
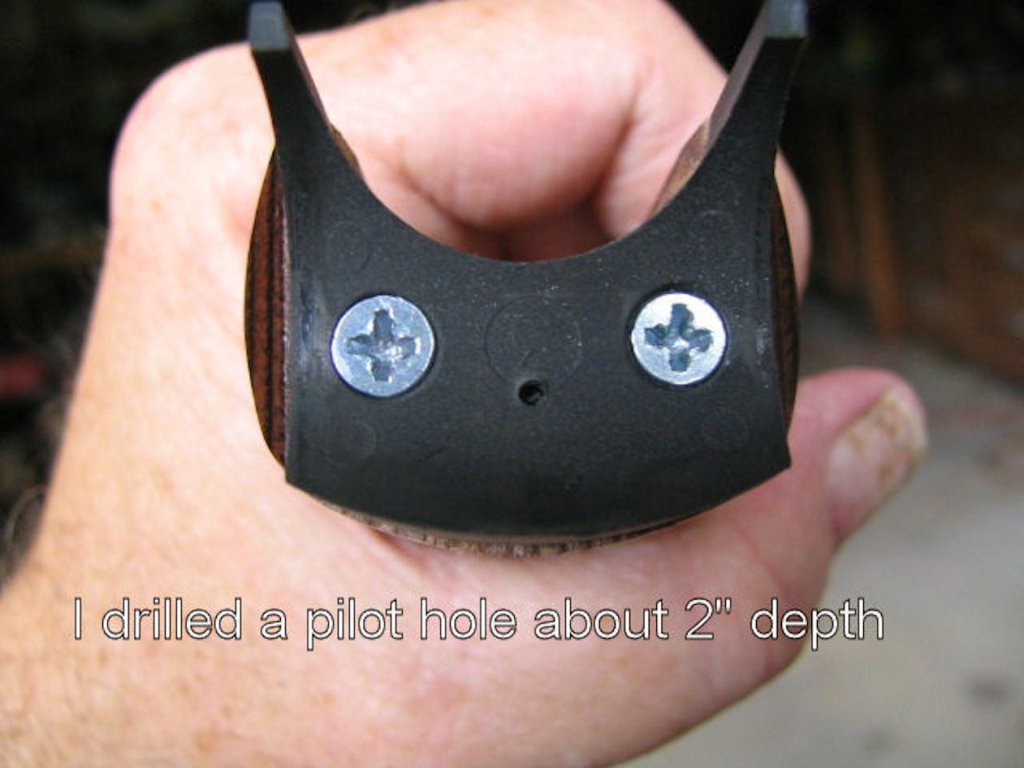
Next I put a center punch in the spot where I was going to drill my holes. This has to be below the center line of the #6 screws so that it will come to bear on the center rib of your SB2 receiver. If you get it too high, it might miss the front of the receiver and/or drill out through the top of the fore arm.


I drilled a pilot hole through the spacer and into the fore end. The hole depth will depend on your spring length. Make it a little shorter that the spring. In this picture I said 2", but I really went about a 1 1/4". Keep it as square as you can with the face of the fore end.


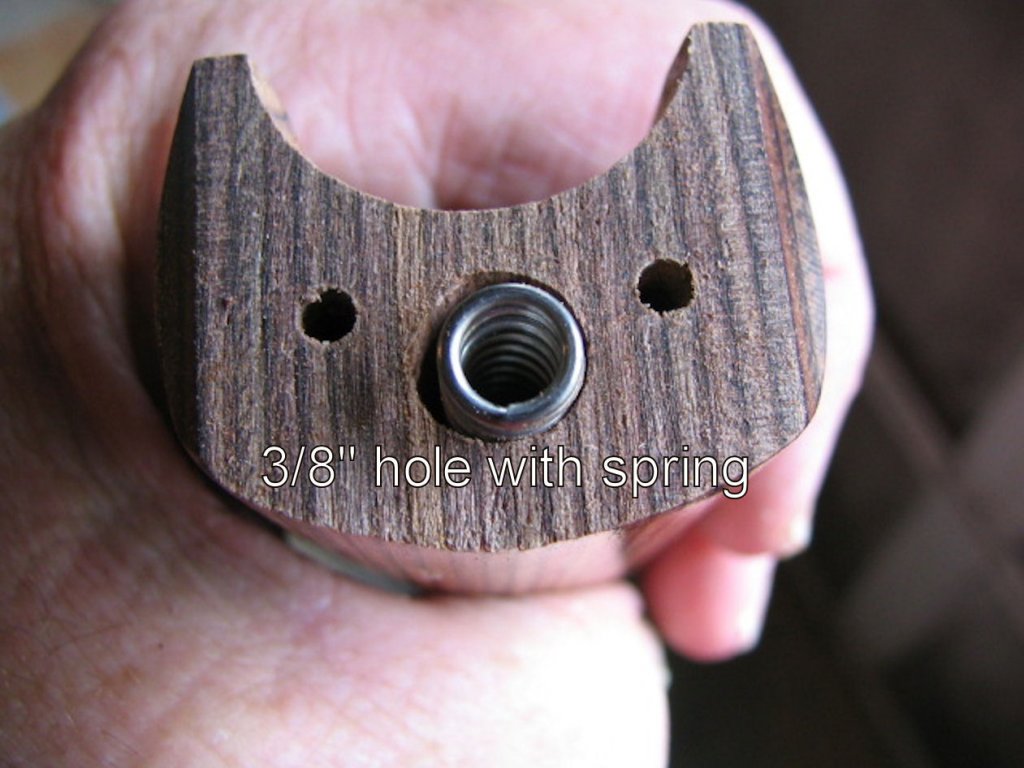
This shows the spring in the hole. After drilling the pilot hole, I drilled a 3/8" hole about 1 1/4" deep. The spring sticks out just about a 1/4". You can vary this dimension depending on the spring you use and how much tension you want. Remember you are going to have the depth of the head under there too. This adds a little more spring tension.


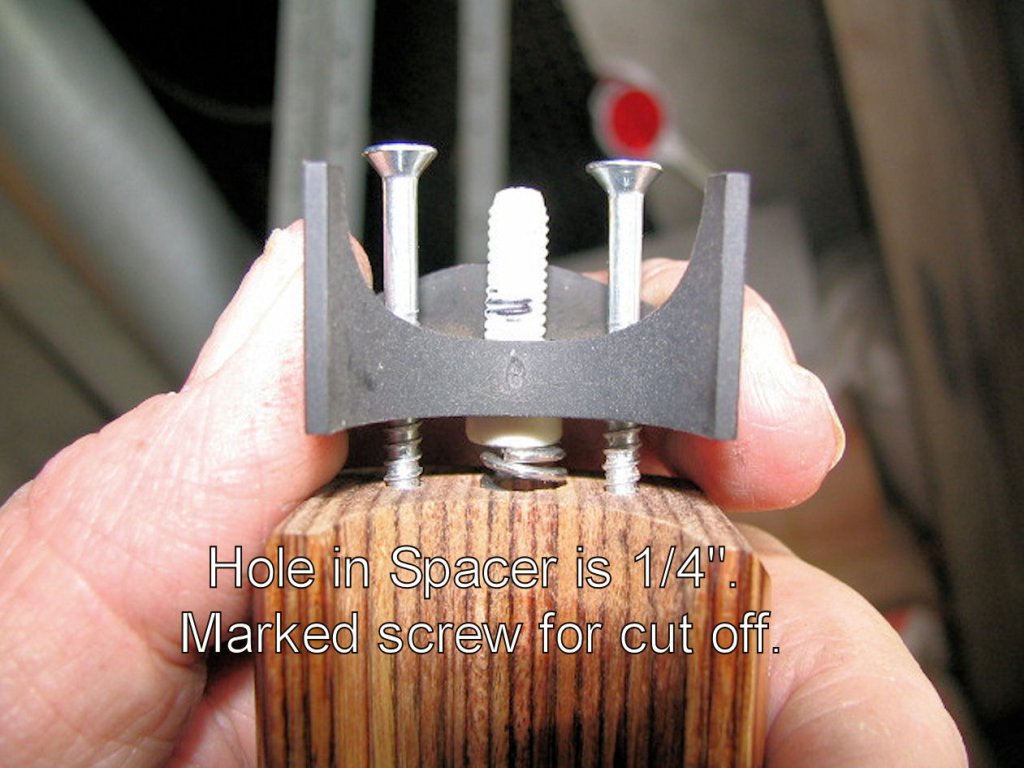
This next picture shows it all going together for a test. I have already drilled a 1/4" hole through the spacer. Vary this depending on the screw you use. I put this together to decide how much of the screw I want to cut off. I marked the screw where to cut. I took it back apart and cut the screw off with a hack saw and then smoothed up the end so it had slightly rounded edges. See how the button (former screw) head will fit into the 3/8" hole?


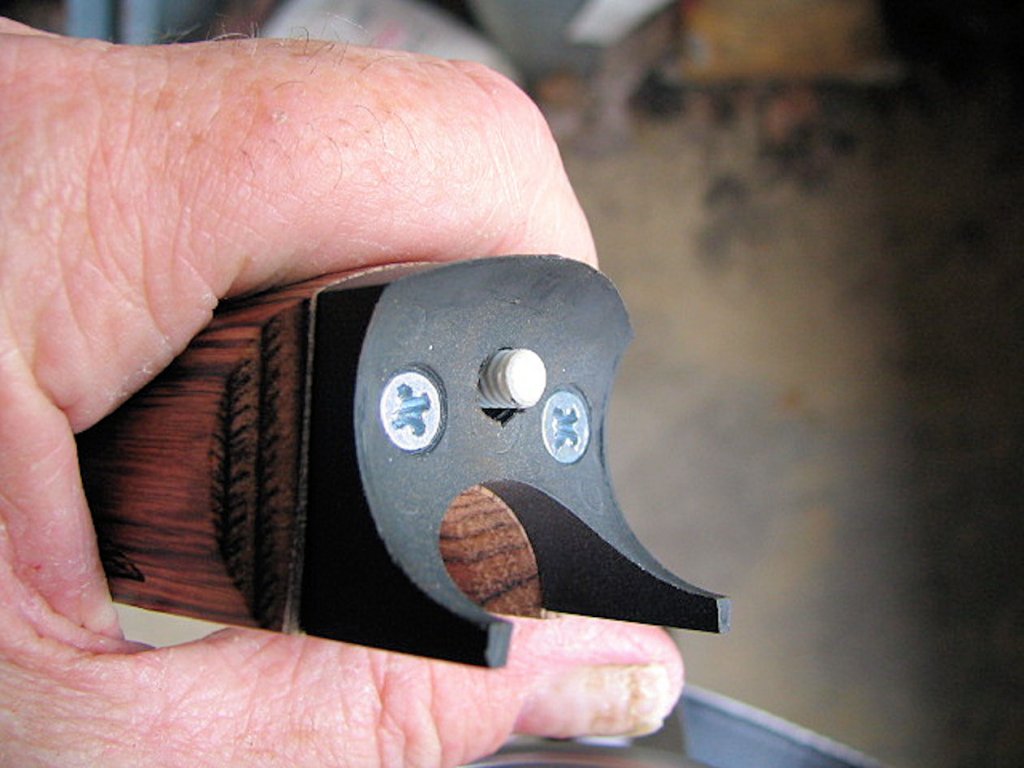
This picture shows it all put together. The button sticks out about 3/16" or so.


You can vary the tension by using a heavier spring or shimming under the one that is there. You can decrease the tension by using a lighter spring or clipping a coil or two off. If you decide this is not going to work, all you have to do is remove the nylon button and spring and it will act just like it did before. It does not take very long to do this. It took me about 1 1/2 hours, but that included gathering up the tools, drill bits and taking pictures. If I had it all together to start with and did not take pictures, you can get it done in 30 minutes - easy. Good Luck and Good Shooting.

edit - According to my digital bathroom scales the pressure it takes to depress the plunger is 7.4 pounds. Not a lot but should be repeatable.
Great men have vision and resolve to make dreams come true.

Offline Troyboy

  • GBO Supporter
  • Trade Count: (41)
  • Senior Member
  • *****
  • Posts: 1220
  • Gender: Male
  • Work more talk less
Re: Making a fore end pressure point against the reciever
« Reply #1 on: August 07, 2008, 12:43:32 PM »
Wow, when did you think of that? Looks like a great idea. I am really curios about this one. Very inexpensive and easy. Please let us know how the groups change . Thank you for the information.
.204 .22lr .22wm .25acp .223 5.56 .243 .25-06 6.5x55  .308  .300wbymag  7.5x54  7.62x25 7.62x39  338-06  9x19 .38spl  9x18 .45acp . 45-70 .500s&w 12rfl 12smb 20smb  .45lc 410smb .22hornet .280AI    Ask not what your country can do for you BUT what can YOU do for your country

Offline LaOtto222

  • GBO Supporter
  • Trade Count: (0)
  • Senior Member
  • *****
  • Posts: 3828
  • Gender: Male
Re: Making a fore end pressure point against the reciever
« Reply #2 on: August 07, 2008, 01:20:32 PM »
If every thing goes as planned, I will do some shooting over the weekend. I have before groups and will post new ones to compare. I also have seven different loads to try using different powders and bullets. This is for my 22 Hornet SL. I have gotten mixed results with it. No consistency, I hope this helps.
Great men have vision and resolve to make dreams come true.

Offline quickdtoo

  • Global Moderator
  • Trade Count: (149)
  • Senior Member
  • *****
  • Posts: 43295
  • Gender: Male
Re: Making a fore end pressure point against the reciever
« Reply #3 on: August 07, 2008, 02:14:44 PM »
It's always nice to have another option, more good stuff for the FAQs!!  ;)

thanks,

Tim
"Always do right, this will gratify some and astonish the rest" -  Mark Twain

Offline sooter

  • Trade Count: (0)
  • Member
  • *
  • Posts: 80
Re: Making a fore end pressure point against the reciever
« Reply #4 on: August 07, 2008, 03:31:46 PM »
Absolutely fantastic idea. I will definantlt give this a try on one of my accuracy challenged rifles. Thank you for taking the time to take pictures and show us these things.

sooter

Offline Spanky

  • Moderators
  • Trade Count: (96)
  • Senior Member
  • *****
  • Posts: 4627
  • Gender: Male
  • USMC Semper Fidelis
Re: Making a fore end pressure point against the reciever
« Reply #5 on: August 07, 2008, 05:59:00 PM »
I can't really see the point in doing this.
The tension will not stay constant because the plastic plunger will wear slightly each time you open and close the gun as it rubs against the steel receiver.
As the spring expands from plunger wear the tension will decrease.
Do you plan on shimming the spring to retain tension as the plunger wears?
Not to mention the fact that spring tension between the frame and the barrel lug will be trying to oblong the hole in the forearm.
Just my 2 cents.
Good luck with it, I hope it works for you.


Spanky

Offline LaOtto222

  • GBO Supporter
  • Trade Count: (0)
  • Senior Member
  • *****
  • Posts: 3828
  • Gender: Male
Re: Making a fore end pressure point against the reciever
« Reply #6 on: August 07, 2008, 11:20:12 PM »
spanky9773 - The plunger is made out of nylon. It is self lubricating. Nylon is used for bearing surfaces. I have a Thumbers Tumbler that is real old and has run for many years and it runs in 4 nylon bearings. It was designed to run for months at a time polishing rocks. As long as the the surface it rubs against is smooth, it should last a long long time with out wearing. As far as the screw hole getting oblonged, check the FAQ there is a place to pillar bed the screw. It is an aluminum tube the screw goes through and is torqued against. I have already done that so no worries with the hole getting oblonged.
Great men have vision and resolve to make dreams come true.

Offline STUMPJMPR

  • Trade Count: (4)
  • Senior Member
  • *****
  • Posts: 1037
Re: Making a fore end pressure point against the reciever
« Reply #7 on: August 08, 2008, 01:53:20 AM »
I fail to see what fore arm pressure against the receiver will do.... I can see pressure on the barrel making a difference.... Could someone please enlighten me...

Offline Spanky

  • Moderators
  • Trade Count: (96)
  • Senior Member
  • *****
  • Posts: 4627
  • Gender: Male
  • USMC Semper Fidelis
Re: Making a fore end pressure point against the reciever
« Reply #8 on: August 08, 2008, 04:40:05 AM »
spanky9773 - The plunger is made out of nylon. It is self lubricating. Nylon is used for bearing surfaces. I have a Thumbers Tumbler that is real old and has run for many years and it runs in 4 nylon bearings. It was designed to run for months at a time polishing rocks. As long as the the surface it rubs against is smooth, it should last a long long time with out wearing. As far as the screw hole getting oblonged, check the FAQ there is a place to pillar bed the screw. It is an aluminum tube the screw goes through and is torqued against. I have already done that so no worries with the hole getting oblonged.


That makes sense.
I stand corrected.


Spanky

Offline stimpylu32

  • Moderators
  • Trade Count: (67)
  • Senior Member
  • *****
  • Posts: 6062
  • Gender: Male
Re: Making a fore end pressure point against the reciever
« Reply #9 on: August 08, 2008, 05:05:01 AM »
I fail to see what fore arm pressure against the receiver will do.... I can see pressure on the barrel making a difference.... Could someone please enlighten me...

Let me try this without sounding like an idget , most Handi's run a gap of .001 to .002 at the breach face between the breach and the barrel , what this will do is to insure that the gap remains constent as the forarm is held forward against the forarm lug or the screw depending weather its pillar bedded or just a standard forarm .

I hope that makes sense .

stimpy
Deceased June 17, 2015


:D If i can,t stop it with 6 it can,t be stopped

Offline LaOtto222

  • GBO Supporter
  • Trade Count: (0)
  • Senior Member
  • *****
  • Posts: 3828
  • Gender: Male
Re: Making a fore end pressure point against the reciever
« Reply #10 on: August 08, 2008, 07:28:46 AM »
I think Stimpy did good here - maybe this will help also.

I fail to see what fore arm pressure against the receiver will do.... I can see pressure on the barrel making a difference.... Could someone please enlighten me...

I am not talking great forces here - If you push the fore end straight out from the receiver you need equal pressure pushing back the other way. This is accomplished through pulling the on the hinge pin. The force travels down the fore end to the barrel lug. It then travels back through the barrel to the hinge pin. The end effect is barrel will pull into the hinge pin about the same force as the spring load. It will also help even the force the fore end spacer puts on the front of the reciever and put some up pressure on the barrel at the barrel lug. Again, I am not talking great forces, just some. It can be varied too as described above.
Great men have vision and resolve to make dreams come true.

Offline dw06

  • GBO Supporter
  • Trade Count: (6)
  • Senior Member
  • *****
  • Posts: 1074
  • Gender: Male
Re: Making a fore end pressure point against the reciever
« Reply #11 on: August 08, 2008, 08:04:28 AM »
Looking forward to the before and after report!Like Tim said, its nice to have another option.And if it works on the 22 hornet SL, might work for some of the guys with 243 SL.We will be watching.
If you find yourself in a hole,the first thing to do is stop digging-Will Rogers

Offline trotterlg

  • GBO Supporter
  • Trade Count: (36)
  • Senior Member
  • *****
  • Posts: 3978
  • Gender: Male
Re: Making a fore end pressure point against the reciever
« Reply #12 on: August 08, 2008, 03:32:52 PM »
I think it is a very good idea.  Some of the older shotguns had forearms that snapped on with springs that held them back against the receiver pivot, the Savage 24 has a forearm that is held on that way, it has a constant pressure on the hinge. Anything that makes for consistancy will help these little guys, some of them sure need all the help they can get.   Larry
A gun is just like a parachute, if you ever really need one, nothing else will do.

Offline LaOtto222

  • GBO Supporter
  • Trade Count: (0)
  • Senior Member
  • *****
  • Posts: 3828
  • Gender: Male
Re: Making a fore end pressure point against the reciever
« Reply #13 on: August 09, 2008, 01:33:07 AM »
Some comparison results. Load was WW cases 1st loading, primer - Remington 1 1/2, Powder WW296 12.0 grains, Bullet Mid South 34 grain.
All shot at 50 yards

8/3/08
    AVG      SD         Group size
1. 2924     14.34        1.235"
2. 2923     51.61        1.235"
3. 2945     44.43        1.285" 
4. 2935     27.33        1.173"

8/8/08 After mod
    AVG      SD         Group size
1. 2920     12.9          1.10"
2. 2927      9.07         .550"
3. 2904      4.16         .515"
4. 2952     30.5          1.17"  Vertically strung 1.0" X .560"
5. 2929     38.55        1.365"

Conclusion : mixed - 8/3/08 groups were about the same no matter the SD. The 8/8/08 groups were smaller when the SD was lower. I think the button made a small difference. Look at group #1 on each day. About the same velocity AVG and SD. The second day after the mod, the group was slightly smaller. Group #4 on both days the same type of conclusion slightly better on the second day with similar SD. The group sizes were about the same, but the second one was vertically strung, showing better possibilities (my fault?).

Observations - When the SD was low, better groups were possible. I also shot other loads on 8/8/08. I tried Lil' Gun again. I was getting 3 - 4 shots close, then I would get a flier. In one group, I had 1 shot that was 300+ fps higher than the rest. I had a .450" group going and it threw it off of the paper some 3" away. Another curiosity - using 11.0 grains of IMR 4198 and a 50 grain Mid South bullet I got a .430" group chugging along at 2131 fps with a SD of 20.43. I went back to the same load and got a AVG velocity of 2123 with a SD of 46.74 and the group was 4"; absolutely horrible.

I am not getting results that are consistent enough to tell for sure that the modification works. My gut feel is, it does help a little. Nothing dramatic just a little. When the SD is down, I get decent groups with the mod, with out it they are about twice as large even when the SD is not too bad. I am going to leave it in place and pursue a load that is more consistent. I have been using Remington 1 1/2 primers, I think I will try a different primer with the 296 or H110 (I have both) and 34 grain bullet and see if I can get more constancy. The 34 grain Mid South bullet shows potential and I like the velocity I am getting. I shot several 40 grain V Max in different loads. My gun does not seem to like them. I could not get a decent group when using this bullet. I found the same before, but I though maybe...but no. The Hornady 45 Hornet has possibilities too. had them loaded over Lil'Gun I was getting around 2500 fps. I would get a tight group going until it threw one.
Great men have vision and resolve to make dreams come true.

Offline quickdtoo

  • Global Moderator
  • Trade Count: (149)
  • Senior Member
  • *****
  • Posts: 43295
  • Gender: Male
Re: Making a fore end pressure point against the reciever
« Reply #14 on: August 09, 2008, 04:49:14 AM »
Thanks for the detailed test report, looks promising, perhaps there's something else afoot like inconsistent lockup or a defective transfer bar??  :-\

Tim
"Always do right, this will gratify some and astonish the rest" -  Mark Twain

Offline chip-don

  • GBO Supporter
  • Trade Count: (1)
  • Member
  • *****
  • Posts: 78
Re: Making a fore end pressure point against the reciever
« Reply #15 on: August 09, 2008, 12:35:49 PM »
doing the exp.. with different guns would make the results more meaningfull trying something new is a lot of work and sometimes very satisifying goood job :)

Offline trotterlg

  • GBO Supporter
  • Trade Count: (36)
  • Senior Member
  • *****
  • Posts: 3978
  • Gender: Male
Re: Making a fore end pressure point against the reciever
« Reply #16 on: August 09, 2008, 03:36:23 PM »
A year or so ago I took a couple of barrels (MSP Retired) and trued the breaches, turned the muzzels concintric with the bores and crowned them,  as I recall it improved the groupings by about 25 - 30%. I think there is no single thing you can do to improve accuracy, these are inexpencive rifles, there is room for improvment in many areas, mostly involving finish and tolerances.  The prices are now approaching those of bolt guns which have a design advantage in the accuracy department, so I think they need to do a little research and shape things up before the the price advantage they once had is totally gone.  Rossi already has quite a price advantage over the H&R for a product that looks nearly identical, so, to the masses of people who they count on to buy them, they are rapidly loosing any sales advantage they once had.  Could be the owners of H&R saw the hand writing on the wall and made a good business decision to sell.  I think that Big Green will most likely keep Marlin and spin off H&R to Braztech.  Larry
A gun is just like a parachute, if you ever really need one, nothing else will do.